Easy entry of an order for an
existing customer or a new customer
Important: Before you begin entering
orders, BasisUSA will help you with two important
preliminary steps:
1)
Copying your customers into the system
2)
Copying your inventory into the system
Your
existing customer information can be copied from any computerized form into the
system.
Entering the program: Double click the icon on
your desktop (Basis OE or order entry), enter your password (TEST if in demo),
then press Enter twice.
Entering a new customer and
finding an existing customer: On the Customer
Billing Information screen (small blue screen), click on Find Customer, then
enter last name and press Enter (the system defaults to last name even though
the account number box is checked). If
you want to search by phone number, click on phone number and enter it exactly
as it is stored. If the customer you are
searching for is found, click anywhere on the customer name, and then click on
Select. If the customer you are searching for is NOT listed, click on Quit.
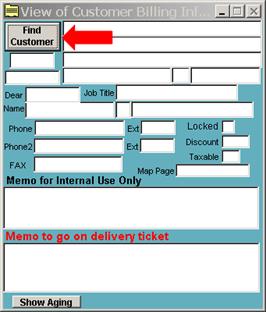
Click
on Add New Customer if you could not
find them by search. The cursor will be
blinking in the company box. Press the tab button to navigate and fill in the
form. The critical items to fill in are:
- Company.
- Address (2 lines
available for this)
- City, State, Zip
- Name of the contact
separated into first name, middle initial and last name
- Phone and fax numbers
- Taxable check box
- How they will be
permitted to pay
- What terms are offered
if they are granted terms as a payment method
When
the new customer information is entered click on the Done button and you will
return to the View of Customer Billing
Information form.
Press F4 to go to the next form:
Delivery Information.
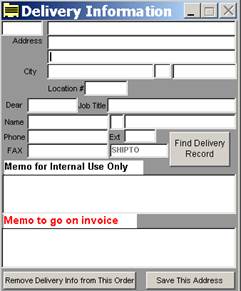
The use of this form is totally optional. If you wish to fill in the delivery
information, you can type in new information and save it, or you can recall
existing delivery information from a previously saved delivery entry for this
customer. Some customers have many
different delivery locations because they are caterers and you will be
delivering to their customers. If you
enter delivery information and do not save it, it will be used ONLY for the
order you are entering. It will not be usable for another order – you will have
to retype the information.
Pressing
F4 again will take you to next form:
the Order Information Form.
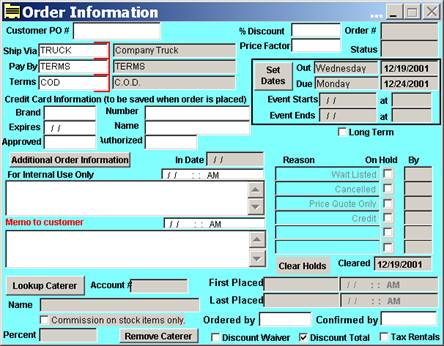
The critical information to be entered in this form is:
·
the date
when the order is to be delivered to or picked up by the customer -- the “OUT
date”
·
the date when the order is to be picked up by
your driver or returned by the customer -- the “IN date.”
The first time you enter this window for a new order, a
date and times entry form will open.
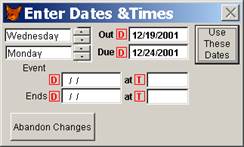
The dates are entered automatically as: the day you are
entering the order and the following Monday respectively.
Once the date is entered you can easily change it.
1) You
can type over a date.
2) By
right clicking on pressing the letter “D” in the date field, you can call up a
calendar to select a date. For these dates, you have up and down arrows that
will advance and roll back the date.
There are corresponding boxes that show what day of the week the date
you have entered falls on.
When you have the OUT and the IN dates set you can enter
line items. Without entering these dates
the reservation system cannot create a booking for an item, so the proper
number of items cannot be reserved until these dates are in.
The other fields in the Date and Times Entry Form are:
·
The event start
date.
·
The event end
date.
·
The time
the event starts and the time the
event ends.
Right click on any of these to
use a lookup facility.
When you have the dates and times set the way you want,
press the button labeled Use These Dates
to return to the Order Information Form.
Everything else on the Order Information Form
can be entered at a later time. (Even
the dates can be reset later if necessary.)
Everything else that is critical to entering the order is set according
to the way you have set up your company and the workstation and the customer
you have selected.
At this point, if you wish, you can press F4 and go directly to the place for
entering you first line item. However, there are a host of other fields that
allow you to make this order more specifically meet your customers’ needs.
The other fields in the Order Information Form are:
·
The delivery
method (selected from the list of company-acceptable methods).
Again, right
clicking provides a lookup.
·
The payment
method that is to be used for this order
It is
important here to distinguish between terms being granted and not being
granted.
·
The discount
for the entire order, entered as a percentage.
(e.g. 10.5 will discount the order ten and one half percent.)
·
The price
factor will multiply all prices by this factor. This function was created
to accommodate events that were overly long.
If an event lasts through a weekend (usually the normal event rate), all
week, or all week plus two weekends, the price factor can be used to set the
prices accordingly. For example 2, 2½,
or 3 times the normal event rate.
·
The customer
PO number is used to hold a number needed by some larger corporations.
·
Credit
card information. This should be
kept with the customer information so that it can be reused on subsequent
orders if permitted. If the customer
credit card information is filled in, then it will be automatically filled in
on this form if payment method selected is Credit Card.
·
Notes:
For Internal Use Only – this box is for notes that are only
available when looking at this form for the order.
Memo to Customer – this box is for notes that will be printed on
picking lists and invoices.
These notes are specific to this
order and are separate from the customer, deliver, company notes that can
appear on invoices etc.
·
The name
of the person who made the order (Ordered By). This should be the name of the
person at the caterer or the name of the person at the company who is ordering.
·
The name of
the person confirming the order.
·
A section about holding an order made up of the following:
o A
button to clear all the holds and
clear the order for processing.
o Hold buttons that do the following:
§ Wait
List the Order -- means that the items are reserved but the order is not
processed in a normal production run unless held orders are included.
§ Cancel
the Order -- means that items are not reserved and the order will never be
processed.
§ Make
the order a Price Quote Only -- reserves no items and is never processed.
§ Credit
Hold -- items are reserved but you have a problem with the customer. The order will not be processed unless held
orders are included in the production procedure.
When you clear the last reason
the order is on hold, the clear date will be set. That means the order is ready
to be processed in production.
Note: When an order is held for a reason that prevents its items
from being reserved and that hold is cleared, all of the items in the order are
once again reserved.
·
The section for the caterer:
o Lookup
Caterer -- This section allows you to lookup a caterer from your customer
file. A caterer is a customer who has
the check box checked to specify that they are a caterer. You can also specify their commission is in
the Customer File section on caterers.
o Information
about the caterer -- It displays the caterer and the commission percentage and
whether or not commission is paid on only stock items. This can be changed for the order on this
form. The percentage is taken from the
Customer File and cannot be changed without changing the Customer File
Information, removing the caterer and reselecting the caterer.
o Remove
Caterer -- A button to remove the caterer.
·
At the bottom right of the form are check boxes
that are set according to Company Control File entries. Each of these can be
overridden for this order. They allow
you to tax rentals or not, discount the damage waiver or not, discount the total or the individual
line items.
·
Additional
Order Information -- A button to show a form with additional order
information that can be set including:.
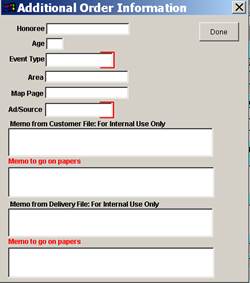
o Who the event is for
o Their age if it’s a birthday party
o The
type of event that it is
o The
area (location) that might be
helpful for a driver or selecting a driver
o A map
page that might be helpful for a driver or selecting a driver
o A
source for the order to help track
what is bringing the business
o The
various memos that are inherited
from the customer and the delivery forms.
Once set, these can only be altered here.
Pressing
F4 again will take you to next form:
the Line Items Form
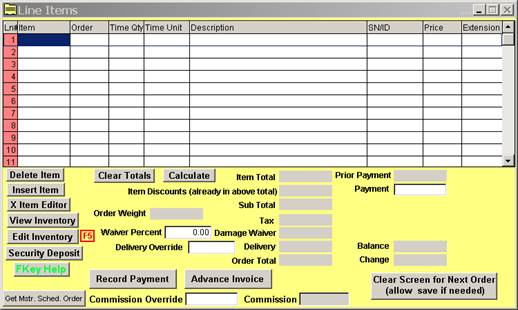
Entering items: The box for line item #1
will be solid in color when you come to the Line Item screen. Type 01 and press Enter. You can now select
the item you need from inventory.
Next,
press tab and enter “1” in the Order box, then press tab until the Unit
Selection box opens. Now pick the unit you want (use the arrow up and down keys
to stay on the keyboard).
Next,
press tab to get to the Price box and enter the price. You must press Enter to move to the next item.
Once
you have entered all of the items, click on Clear Screen for Next Order and
your order will be saved and placed
by clicking Yes at the prompt.
If
you would like to view or print an invoice, click on Advance Invoice (bottom of
screen) and a summary screen will open. You can then view it, and if you like,
print it by clicking on the printer icon.